Problem overview
- Need to run Windows software (Photoshop, Fusion360) with native or near-native perfomance
- Problems with dual-booting, as it requires to reboot a computer and makes it harder to secure-boot and to use bluetooth devices
- The alternative is running other system inside VM, but it is usually much slower in standard solutions like VirtualBox
In this article it will be presented, how to achieve near-native perfomance of Windows VM on a Lenovo laptop with AMD CPU and NVIDIA GPU using QEMU and Libvirt.
Meta
This article serves me as a reference of my gpu passthrough setup and aims to be as precise as it is possible. In places, where things are not specific to this setup, user is redirected to ArchWiki.
Scope of article - What’s missing?
For some reason nftables didn’t work well with libvirt, so as of now i am using iptables_nft on my systems in order to avoid problems with any other tools that use iptables. This guide does not cover details of linux firewall configuration.
Warning
This article is Work in Progress and is incomplete (benchmarks need to be created). Please use comments for reporting errors, typos and inconsistencies.
Hardware used
Laptop model is Legion 5 15ACH6H, which is piece of really decent hardware. It has AMD integrated GPU, NVIDIA GPU and supports docking station.
Specification
Host: 82JU Legion 5 15ACH6H
CPU: AMD Ryzen 7 5800H with Radeon Graphics (16) @ 3.200GHz
GPU: NVIDIA GeForce RTX 3060 Mobile / Max-Q
GPU: AMD ATI Radeon Vega Series / Radeon Vega Mobile Series
Memory: 35935MiB
I use external video capture card(which looks funny) in order to have access to UEFI settings (looking glass starts on windows boot because it’s part is a windows driver)

Definition of Done
Let’s set of requirements for a VM.
- Runing without additonal monitor. We will use Looking Glass, a driver which creates framebuffer which is writed by Windows Guest and read by Linux driver using shared memory between them.
- Wireless mouse support using proxydev (project i wrote) which allows mouse hot-plug and configuration of keyboard macros (to replace LCTRL+RCTRL escape keys with something nicer)
- Wireless headset support. Easy switching of sound between pipewire sinks done at pipewire and XML domain configuration level.
- Near-native perfomance.
Plan is to use AMD iGPU on a host linux system and to pass NVIDIA GPU to a high perfomance VM.
Advantages
- Linux does not have propertiary drivers installed, so it is more reliable
- Windows has full access to NVIDIA GPU and 12/16 cores of host machine
Disadvantages
- Linux uses only AMD iGPU acceleration
- Problems with connecting dock station on Linux
Requirements and precautions
Non-hardware requirements
- Backup of working system is MANDATORY
- Fluence with Linux, knowledge of boot process is mandatory.
- ArchISO USB may be required, when things go wrong
Hardware requirements
- HDMI capture card to keep NVIDIA GPU rendering frames and to have access to VM’s UEFI
Definitions and conventions
This is (incomplete) list of definitions and conventions that are used throughout files in this article.
Names of VMs
Names of VM’s must not change as they will be hardcoded in multiple files.
routeris name of router VM with OpenWRT installedwin-lvmis name of Windows VM with GPU passthrough referred also asGUEST- Host machine is referred as
HOST
Chmod of files
Chmod of files are placed inside of square brackets (i.e ~/.config/pipewire/pipewire-pulse.conf [644]) means that file in ~/.config/pipewire/pipewire-pulse.conf path has chmod 644 and default owner inherited from parent directory. Setting right permissions is crucial. In case of files modified files it may not be needed to change chmod.
Plan
- Setup networking and router VM
- Configure encrypted storage in order to have place to install a VM
- Configure system and passthrough VM
- Render frames on laptop display using Looking Glass
- Mouse hot-plug support using proxydev
- Improve sound support by modifying pipewire config
Basic HOST OS setup
Initramfs vfio driver override
This article describes how to load stub PCI drivers by adding a hook to initramfs, which prevent loading any other drivers and allows to pass GPU to GUEST OS.
QEMU/Libvirt
This setup uses libvirt - ArchWiki which is CLI user-friendly interface to QEMU. Virt-Manager - ArchWiki is GUI interface which uses libvirt. This guide assumes that user has installed working virt-manager.
pacman -S qemu-full libvirt virt-manager dnsmasq swtpm edk2-ovmf
pacman -S git # for custom packages
systemctl enable --now libvirtd.service
usermod -aG libvirt mono
Create groups to pass pipewire socket and looking glass access
sudo groupadd libvirt-shared
sudo usermod -aG libvirt-shared mono
sudo usermod -aG libvirt-shared libvirt-qemu
Logout and login again in order to reload groups.
Libvirt QEMU configuration
When libvirt launches QEMU it uses /etc/libvirt/qemu.conf config file two devices need to be added to access list /dev/kvmfr0 (Looking Glass related) and /dev/input/by-id/proxydev (proxydev related), these devices do not exist yet, but they will be created in this guide.
/etc/libvirt/qemu.conf
cgroup_device_acl = [ "/dev/kvmfr0",
    "/dev/null", "/dev/full", "/dev/zero",
    "/dev/random", "/dev/urandom",
    "/dev/ptmx", "/dev/kvm", "/dev/input/by-id/proxydev"
]
Libvirt service may need to be restarted after these changes
# systemctl restart libvirtd.service
Storage device (optional)
Visit this article, alternatively qcow or raw image may be used and should not introduce significant IO overhead.
<disk type="block" device="disk">
  <driver name="qemu" type="raw" cache="none" io="native" discard="unmap"/>
  <source dev="/dev/lvm-vm-vg/win" index="1"/>
  <backingStore/>
  <target dev="sdh" bus="sata"/>
  <alias name="sata1-0-1"/>
  <address type="drive" controller="1" bus="0" target="0" unit="1"/>
</disk>
Enable default network
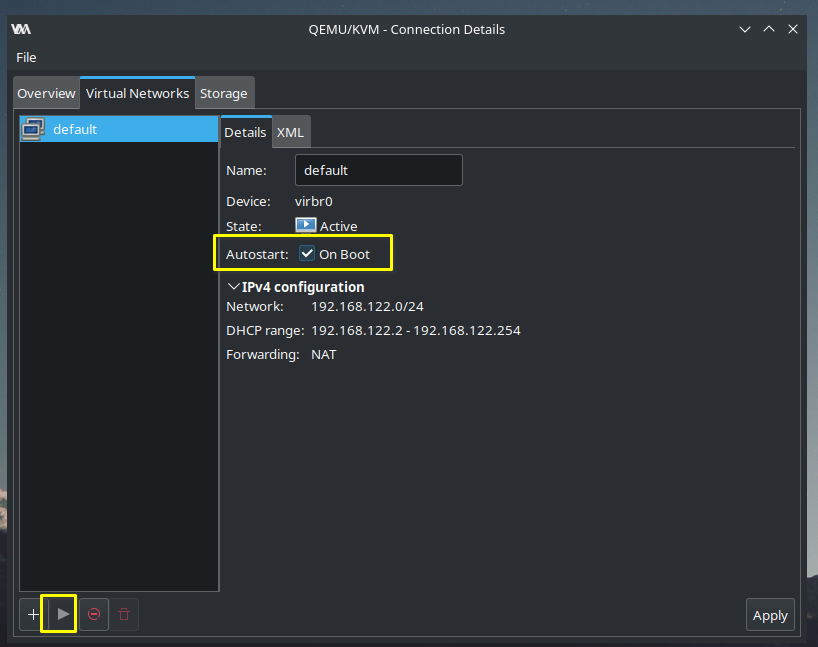
Start default network and enable it on boot.
XML Editing
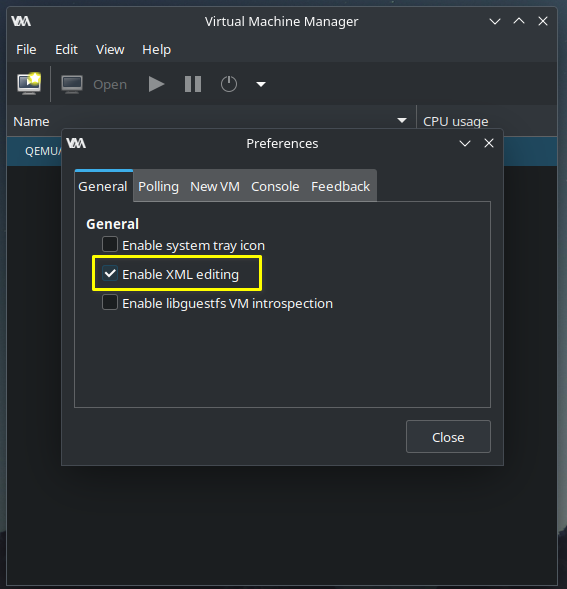
XML editing is disabled by default
QEMU hooks (mandatory)
Hooks do following things:
- Dynamic disabling CPUs using systemd
- Enable router when windows vm launches (this part is tricky, because we need to somehow execute it later, that’s why i use oneshot systemd service for that)
- Prevent system from going to sleep
Semi-automatic setup
I created a package that makes this process easier
Installing main qemu hook
After installing package above.
In order to install hook in /etc/libvirt/hooks/qemu use following command
# vm-hooks-installer install
it will create directories and copy script
Manual setup (not recommended)
Visit this article
Networking (optional)
Visit router setup article in order to configure router device. Alternatively standard NAT networking can also be used.
Filesharing - SMB configuration (optional)
Linux samba configuration
Visit this cheatsheet. Alternatively use other file sharing methods.
Aditionally ip range can also be restricted
[global]
  ...
# allow only local ip range
  hosts allow = 10.100.100.0/24
   ...
Windows guest
Requires adding share by right-clicking close to disks inside Computer menu.
Windows VM
In order to achieve near-native perfomance most important things are:
- Configuration
- CPU pinning
- GPU passthrough
Basic VM setup
Visit this article
Configuration
- After adjusting hyper-v and clock features perfomance should improve. These setting may have big impact on perfomance and they require only XML modification.
<features>
  <acpi/>
  <apic/>
  <hap state="on"/>
  <hyperv mode="custom">
    <relaxed state="on"/>
    <vapic state="on"/>
    <spinlocks state="on" retries="8191"/>
    <vpindex state="on"/>
    <synic state="on"/>
    <stimer state="on"/>
    <reset state="on"/>
  </hyperv>
  <kvm>
    <hidden state="on"/>
  </kvm>
  <vmport state="off"/>
  <smm state="on"/>
  <ioapic driver="kvm"/>
</features>
clock configuration also affects perfomance
<clock offset="localtime">
  <timer name="rtc" tickpolicy="catchup"/>
  <timer name="pit" tickpolicy="delay"/>
  <timer name="hpet" present="no"/>
  <timer name="hypervclock" present="yes"/>
</clock>
- I added some AMD-specific flags which should improve perfomance.
<cpu mode="host-passthrough" check="none" migratable="on">
  <topology sockets="1" dies="1" cores="6" threads="2"/>
  <cache level="3" mode="emulate"/>
  <feature policy="require" name="topoext"/>
  <feature policy="require" name="invtsc"/>
  <feature policy="disable" name="amd-stibp"/>
</cpu>
Disabling CPU dynamically (mandatory)
Excluding CPU cores from a HOST and pinning CPU cores to a VM improves perfomance significantly. It is relatively easy task which requires to define CPU topology and to create hook to disable/enable cores on demand.
Design choices
I decided to give maximum number of cores to VM dynamically, but number of CPUs to pass is matter of personal preference and benchmarking.
CPU cores exclusion
Number of cores used by system is limited using systemctl command which is run inside a libvirt hook which has great advantage of being able to do it dynamically. When VM is not running, these CPU cores can be used by HOST system oposed to potential kernel cmdline which would make them available only for GUEST VM. It has disadvantage of not isolating kernel threads but it was never a problem for me.
CPU topology
Choice of cores must follow an algorithm in order to make best use of cache and to avoid cache eviction.
<vcpu placement="static">12</vcpu>
<iothreads>1</iothreads>
<cputune>
  <vcpupin vcpu="0" cpuset="4"/>
  <vcpupin vcpu="1" cpuset="5"/>
  <vcpupin vcpu="2" cpuset="6"/>
  <vcpupin vcpu="3" cpuset="7"/>
  <vcpupin vcpu="4" cpuset="8"/>
  <vcpupin vcpu="5" cpuset="9"/>
  <vcpupin vcpu="6" cpuset="10"/>
  <vcpupin vcpu="7" cpuset="11"/>
  <vcpupin vcpu="8" cpuset="12"/>
  <vcpupin vcpu="9" cpuset="13"/>
  <vcpupin vcpu="10" cpuset="14"/>
  <vcpupin vcpu="11" cpuset="15"/>
  <emulatorpin cpuset="0-1"/>
  <iothreadpin iothread="1" cpuset="0-1"/>
</cputune>
Cores at indexes from 4 to 15 (summed up 12 cores) are passed to a VM guest.
Windows installation
When CPU cores are pinned it is time to install Windows on a VM. If TPM 2.0 emulated device and UEFI secure boot firmware are selected, there should be no problems with hardware requirements.
GPU passthrough
Enabling IO-MMU
IO-MMU must be enabled and this process is explained pretty well on PCI passthrough via OVMF - ArchWiki. On AMD devices IOMMU might be enabled by default, it can be checked in dmesg.
$ sudo dmesg  | grep -i iommu
[    0.364465] iommu: Default domain type: Translated
[    0.364465] iommu: DMA domain TLB invalidation policy: lazy mode
[    0.505530] pci 0000:00:00.2: AMD-Vi: IOMMU performance counters supported
[    0.505570] pci 0000:00:01.0: Adding to iommu group 0
[    0.505578] pci 0000:00:01.1: Adding to iommu group 1
...
[    0.505830] pci 0000:07:00.1: Adding to iommu group 7
[    0.507291] pci 0000:00:00.2: AMD-Vi: Found IOMMU cap 0x40
[    0.510676] perf/amd_iommu: Detected AMD IOMMU #0 (2 banks, 4 counters/bank).
[    0.523886] AMD-Vi: AMD IOMMUv2 loaded and initialized
Libvirt configuration for GPU passthrough.
GPU must be passed through in libvirt interface.
Easiest way
It is easiest to use ‘Add Hardware’ menu in libvirt domain configuration, so XML like this above will be generated automatically.
- Passthrough NVIDIA video card
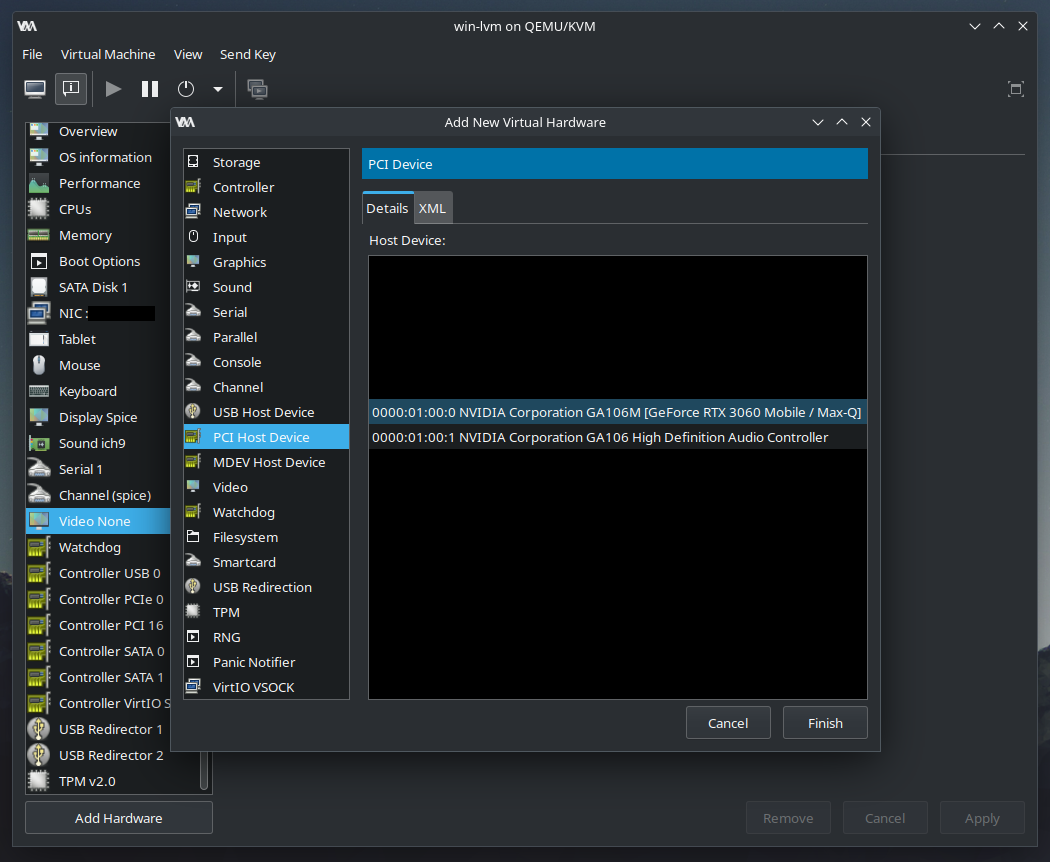
- Passthrough nvidia sound card (logically separated device)

- Disable built-in virtualized video card

Example output
<devices>
  ...
  <hostdev mode="subsystem" type="pci" managed="yes">
    <source>
      <address domain="0x0000" bus="0x01" slot="0x00" function="0x0"/>
    </source>
    <address type="pci" domain="0x0000" bus="0x01" slot="0x00" function="0x0"/>
  </hostdev>
  <hostdev mode="subsystem" type="pci" managed="yes">
    <source>
      <address domain="0x0000" bus="0x01" slot="0x00" function="0x1"/>
    </source>
    <address type="pci" domain="0x0000" bus="0x04" slot="0x00" function="0x0"/>
  </hostdev>
  ...
</devices>
Looking glass setup
External monitor issue
Output from NVIDIA graphic card is displayed, but it requires connected monitor. It is possible to connect VGA capture card (which ‘pretends’ to be a monitor) so GPU generates frames which will be intercepted by Looking glass.
What is looking glass
Looking Glass is an open source application that allows the use of a KVM (Kernel-based Virtual Machine) configured for VGA PCI Pass-through without an attached physical monitor, keyboard or mouse. source: Looking Glass website
Installation details
Looking glass requires user to install
- HOST OS Kernel module on Arch system
- HOST OS Client app to display window with intercepted frames
- GUEST OS Kernel module on Windows system Guide how to install Looking Glass is available on Looking Glass website.
Looking Glass updates
I remember having some problems with installation of Windows driver, but after it was installed it did not require updates and it seems to be decoupled from Windows part, but this is only my observation not some deeper research. Linux version of LG is made of two parts - client application which renders frames and kernel module, which processes frames from shared memory. Looking Glass kernel driver may broke when kernel API changes, but this kind of change will be very likely easy to fix. User can also downgrade kernel or wait for maintainer to provide update.
Installing Looking Glass the easy way
There exists also Looking Glass AUR package.
- Install package dependencies not listed in package
$ sudo pacman -S linux-headers
- Download package
git clone https://aur.archlinux.org/looking-glass.git
- Build package and install looking glass client
cd looking-glass
makepkg -si
- Client package was installed, but kernel module must also be installed.
sudo pacman -U looking-glass-module-dkms-*.pkg.tar.zst
- Create
/etc/modules-load.d/kvmfr.conf[644]file in order to load kvmfr module on system start.
kvmfr
- Setup
/dev/shm/looking-glasspermissions
/etc/tmpfiles.d/10-looking-glass.conf
f /dev/shm/looking-glass 0660 libvirt-qemu libvirt-shared -
- Enable memory sharing

- Add IVSHMEM device to domain
<devices>
  ...
  <shmem name="looking-glass">
    <model type="ivshmem-plain"/>
    <size unit="M">32</size>
    <address type="pci" domain="0x0000" bus="0x10" slot="0x01" function="0x0"/>
  </shmem>
</devices>
Looking Glass windows driver installation
Looking glass windows driver is required to pass frames to shared memory device. Installation guide is available on official website
Looking Glass icon and run parameters
Visit this repo to install icon which will appear in start menu.
- Use port specified in .desktop file from repo to avoid issues with dynamic allocation.
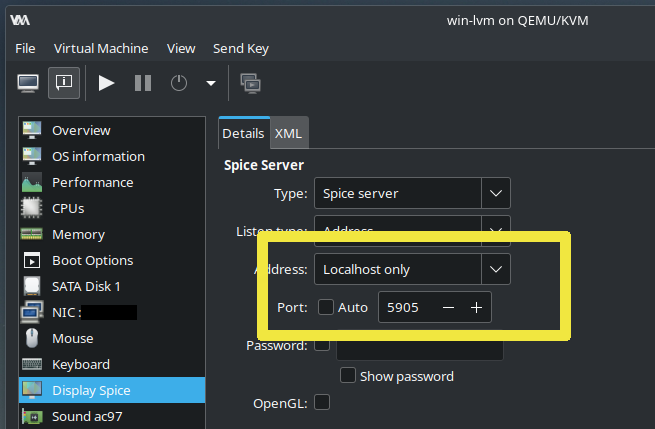
- This is part of looking glass desktop shortcut
[Desktop Entry]
Name=Looking Glass
...
Exec=/usr/bin/looking-glass-client -m 69 -f /dev/shm/looking-glass -c 127.0.0.1 -p 5905 spice:input=no
Improving User Experience
Improve wireless devices support.
Wireless mouse support
Visit this article
Convenient sound support
Visit this article
Gitlab repo link
Checkout this repository for Libvirt domain XML configs.
Benchmarks
Visit this article
Conclusion
Creating a working and user-friendly setup of near-native perfomance VM is multi-step process which is prone for errors and dependent on user’s hardware configuration, every configuration will differ depending on hardware and user’s requirements. I hope this article will shed some light on the mystery surrounding performant VMs.